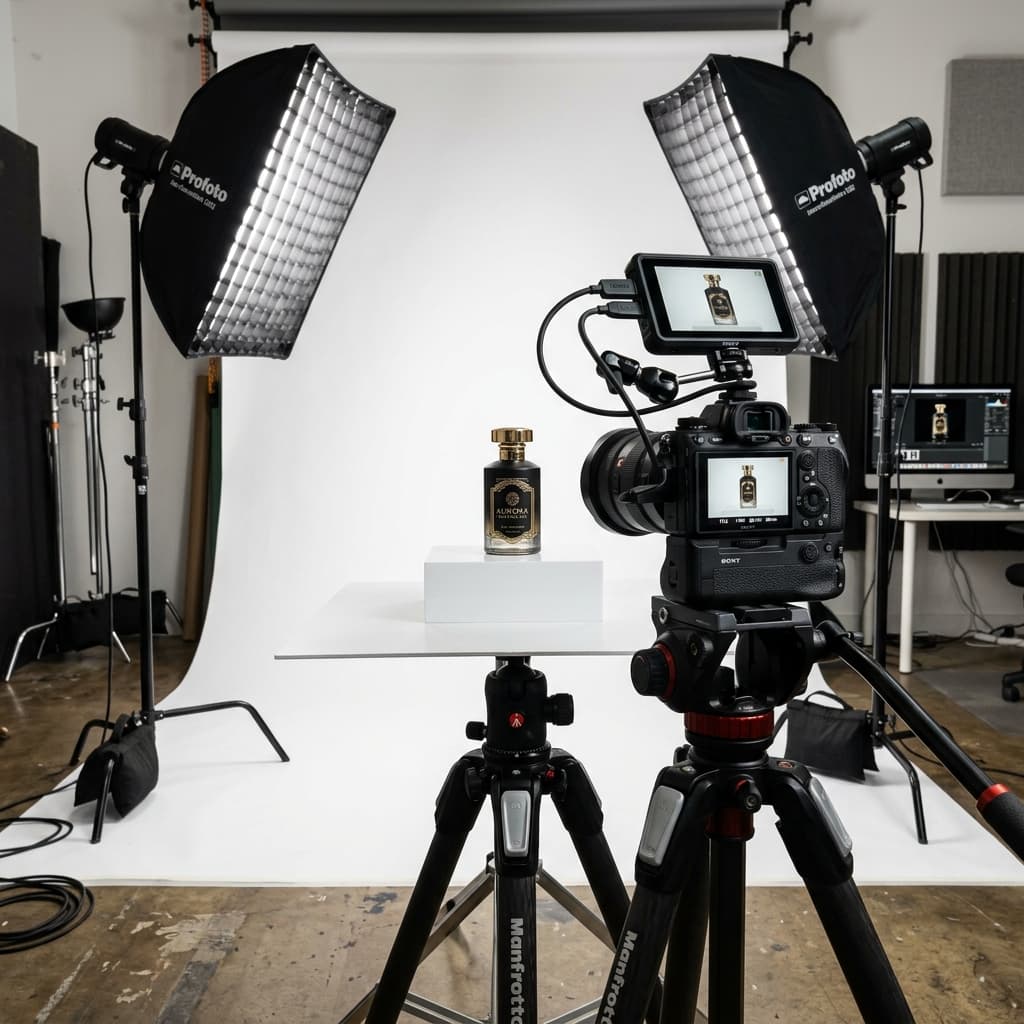
White background product photography is the standard for Amazon, Shopify, and virtually every major e-commerce platform — and you don't need a professional studio to achieve it. With the right setup, you can produce clean, marketplace-ready product images at home for a fraction of the cost of a commercial shoot. This guide covers everything: the gear you actually need, how to position your lights, which camera settings to dial in, and the common mistakes that make backgrounds go grey instead of white.
What You Need: Equipment List
The good news is that professional-looking white background shots don't require a professional budget. Here's what you need, in order of priority:
- White sweep or backdrop: A roll of white seamless paper (about $20–$40 from any photography supplier) is the most versatile option. It curves from vertical wall to horizontal surface with no visible edge or shadow line. A white foam board or white fabric can work for small products, but paper gives you the cleanest, most replaceable surface. Replace it when it marks.
- Lighting — two softboxes or a window plus reflector: Even, diffused light is the single most important factor in getting a true white background. Two entry-level softboxes ($60–$150 for a basic kit) let you control both sides independently. If you're on a very tight budget, a large north-facing window provides excellent diffused natural light — pair it with a white foam board as a reflector on the opposite side to fill in shadows.
- Camera or smartphone: A DSLR or mirrorless camera gives you full control over settings, but modern smartphones (iPhone 14 and later, current Samsung flagships) are capable of excellent product shots in good light. The light matters more than the camera.
- Tripod: Non-negotiable. Consistency across a product range requires identical framing for every shot. A tripod also lets you use lower ISO and slower shutter speeds without camera shake, which improves image quality significantly.
- Optional but useful: A small product turntable for even spacing on multi-angle shots; gaffer tape to secure your paper sweep; a small level to confirm your shooting surface is flat.
Setting Up Your Space
The physical setup matters as much as the equipment. A common beginner mistake is placing the product directly against the background — this creates shadows and makes it much harder to separate the product from the backdrop in post.
- Curve the sweep properly: Tape or clip your paper roll high on a wall and let it curve gently down to the table surface. The curve should be gradual — a tight bend creates a visible shadow line that no amount of editing can fully remove. The product sits on the horizontal section of the sweep.
- Distance from the backdrop: Place the product at least 60–90 cm away from the background. This separation is what allows you to light the background independently and ensure it reads as pure white without contaminating the product with spill light.
- Elevate the product slightly: For products with a base (bottles, boxes, small objects), elevating them on a clear acrylic riser or a small white platform keeps the bottom edge clean and prevents the product from "melting" into the surface with no visible separation.
- Clean your sweep: Footprints, dust, and marks on the paper all show up in the final image. Replace or trim the marked section before shooting — paper is cheap, reshoots are not.
Lighting Setup
This is where most DIY product shots fail. A single overhead light or a bare flash aimed at the product will produce harsh shadows, hotspots, and uneven backgrounds. The goal is soft, even, controlled light on both the product and the background.
The Two-Light Setup
Position your key light (main softbox) at roughly 45 degrees to the product — either camera left or camera right, slightly above the product plane. This is your primary light source. Then place your fill light (second softbox or white reflector board) on the opposite side at a lower power — typically 1/2 to 2/3 the power of the key light. The fill light opens up the shadows created by the key without eliminating them entirely, which is what gives the product shape and dimension.
Softbox vs. Window Light
Softboxes give you consistent, repeatable light regardless of time of day, weather, or season — essential if you're shooting products over multiple days or weeks. Window light is beautiful but variable: it shifts in colour temperature and intensity throughout the day, making it difficult to maintain consistency across a large product catalogue. If you're shooting a one-off batch of 10–20 products, window light is perfectly workable. For ongoing catalogue work, invest in softboxes.
Lighting the Background Separately
For a truly pure white background, add a third light (or point one of your existing lights) aimed directly at the background paper, positioned behind and below the product. This overexposes the background slightly relative to the product, making it read as white in-camera rather than grey. Keep this light from spilling onto the product — a snoot or barn doors can help contain the spread.
Using a Reflector
If you're shooting with a single key light (window or softbox), place a large white foam board on the shadow side of the product at approximately 45 degrees. This bounces some key light back into the shadows without adding another powered light source. It's a simple, cheap technique that makes a significant difference to shadow depth.
Camera Settings
Consistent, repeatable settings are essential for shooting a product range where all images need to match. Set these and don't change them mid-shoot:
- ISO 100: The lowest native ISO on most cameras. This gives you the cleanest image with minimum noise — important for fine product details and fabric textures.
- Aperture f/8 to f/11: This range gives you sufficient depth of field to keep the full product sharp from front to back. Wider apertures (f/2.8–f/4) look good for lifestyle shots but can leave product edges soft, which causes problems when you need clean edges for background removal later.
- Shutter speed: If using flash or strobes, sync to your flash sync speed (typically 1/125s or 1/200s). If using continuous light or window light, use whatever speed is needed for correct exposure at ISO 100 and your chosen aperture — and use a tripod to avoid motion blur.
- Shoot in RAW: RAW files retain all the information from the sensor and give you far more latitude in post-processing — particularly for white balance adjustments and recovering highlight detail. JPEG is compressed and baked-in; if your white balance or exposure is slightly off, you have very little room to fix it.
- White balance: Set to Daylight (approximately 5500K) if shooting with daylight-balanced strobes or in window light. If your softboxes have a different colour temperature, use a custom white balance measured with a grey card. Auto white balance shifts between shots and creates colour inconsistencies across a range — turn it off.
How to Get a True White Background In-Camera
The goal is to expose the background to pure white while keeping the product correctly exposed. These two objectives can conflict — overexposing for the background blows out the product; underexposing to protect the product leaves the background grey.
The solution is separation: use the additional background light (see Lighting Setup above) to raise the background exposure independently of the product. Start by exposing for the product at your chosen settings, then bring up the background light until the backdrop reads as clean white on your histogram without the product highlights clipping.
Check your histogram, not just the LCD screen: Camera LCD screens are not accurate representations of actual exposure. Enable the highlight warning (blinkies) to see any areas that are blown out. Your background should be at the far right of the histogram — close to clipping but not over. The brightest product highlights should sit just below clipping.
Bracket if unsure: Shoot at your metered exposure, then one stop under and one stop over. This takes three frames per product but gives you a safety net and makes it easier to find the sweet spot when reviewing on a calibrated monitor later.
Common Mistakes to Avoid
Grey Background (Underexposed)
This is the most common beginner mistake. A grey background usually means the background wasn't lit separately, or the overall exposure was too conservative. Fix: add a dedicated background light, or move your product further from the backdrop and bring the background light in closer. Don't try to fix grey backgrounds in post by raising exposure across the whole image — this will blow out your product highlights.
Product Blown Out (Overexposed)
If your background looks white but the product is clipping, your exposure is too high. Reduce the overall exposure by one stop and compensate with additional background-specific lighting rather than raising the global exposure. Check your histogram — overexposed product highlights cannot be recovered from a JPEG, and even in RAW, severe clipping loses colour data.
Hotspots (Direct or Undiffused Light)
Bright specular highlights on shiny products (glass, metal, plastic packaging) from direct, undiffused light are almost impossible to remove in post. Use diffusion material over your softboxes, use a lightbox tent for very small shiny products, or position your lights at shallower angles to the product surface to reduce reflection. A polarising filter on your lens can also reduce specular reflection on non-metallic surfaces.
Shadows Under the Product
Even with a white background, products sitting directly on the sweep will cast shadows beneath them. Elevate the product on a clear riser so shadows fall on the sweep behind and below the product, not directly underneath in the frame. You can then either light those shadows away or clone them out in post. A shadow-free base reads as much more professional than a product appearing to "float" with a grey smudge beneath it.
When Editing Is Still Needed
Even a well-executed white background shoot will typically need some post-processing before the images are truly marketplace-ready. A background that looks white on screen is often reading as RGB 245–250 rather than RGB 255 — and Amazon, for example, requires RGB 255/255/255 for main images.
A quick Levels or Curves adjustment in Lightroom or Photoshop — pulling the white point to the right until the background clips to pure white — is usually all it takes for a well-shot image. This takes about 30 seconds per image once you've built a preset.
If the lighting wasn't ideal, or if you need the product isolated on a transparent background for use across different coloured website templates, you'll need proper background removal — not just a levels pull. That means either hand-cutting a clipping path (accurate but time-consuming) or working with a professional editing service.
BLACKFOX DIGITAL's background removal service handles the full job from $0.29 per image — background cleaned to pure white (RGB 255/255/255), edges hand-clipped for accuracy on complex products, marketplace-compliant output in your required format. If you'd rather spend your time running your business than editing product photos, try the service risk-free at our free trial page. Send your first images, see the results, and decide.
Ready to Skip the Editing Step Entirely?
The photography guide above will get you clean, well-lit product shots. But even perfect in-camera white backgrounds need a finishing pass before they hit Amazon or Shopify. BLACKFOX DIGITAL can handle that final step — or the entire background removal process — so your images go from camera to marketplace without you touching Photoshop. Start your free trial and see the difference professional background removal makes.