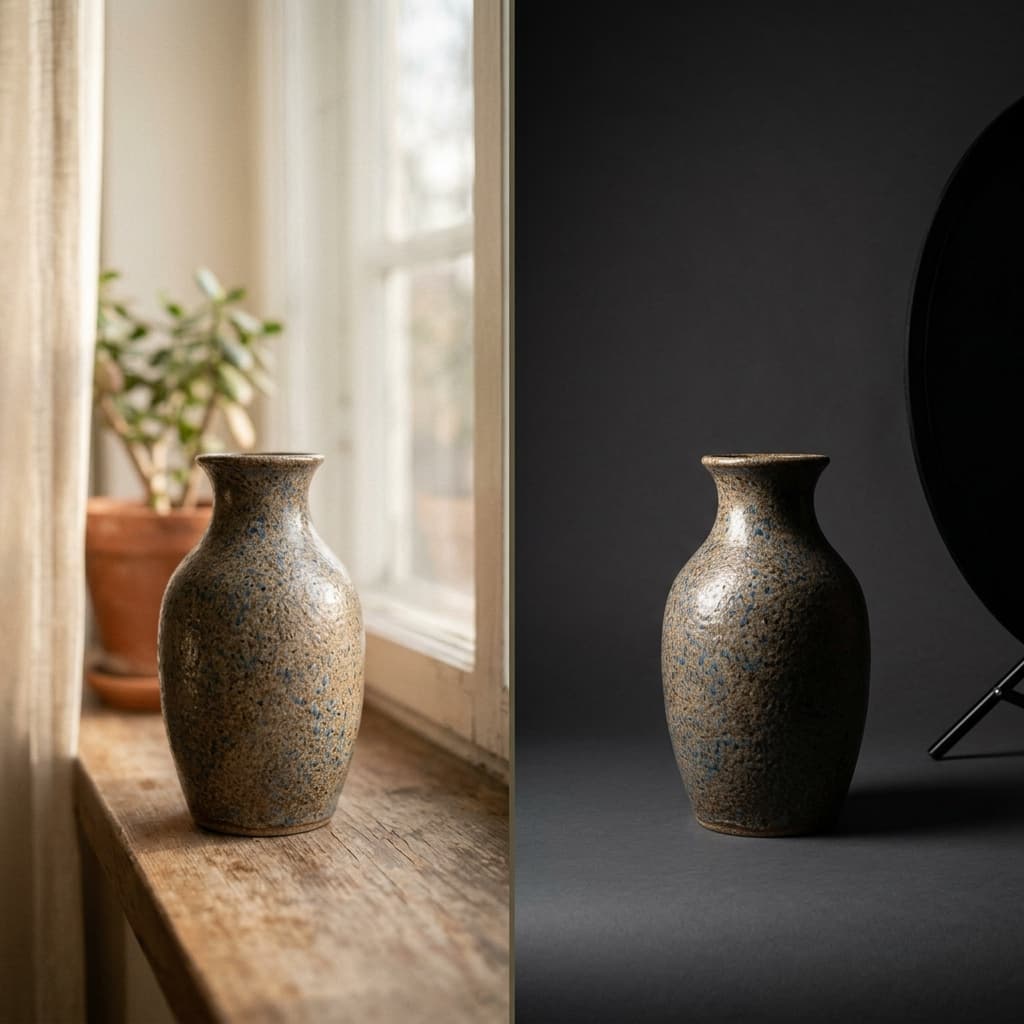
Your lighting setup determines the quality of your product photos more than any other variable — more than your camera body, more than your lens, more than your backdrop. A $300 camera with professional lighting will consistently outperform a $3,000 camera in bad light. Understanding the difference between studio lighting and natural light isn't just technical knowledge — it directly affects your conversion rate.
Why Lighting Beats Camera Quality
This surprises most new sellers, but it's true: camera sensors record light, not objects. What your camera captures is entirely dependent on the light falling on the product. A sensor can only work with what it receives.
Poor lighting creates flat images with no depth, uncontrolled shadows that obscure product detail, colour casts that misrepresent the product, and blown highlights that lose surface texture. No amount of post-processing can recover detail that was never captured in the first place. A mid-range camera with a well-positioned softbox will produce cleaner, sharper, more marketable images than a flagship mirrorless in harsh overhead fluorescent light.
This is why professional studios invest in lighting first — cameras are almost secondary.
Natural Light: Pros and Cons
Natural light from a window is the starting point for most small-scale product photography — and for good reason. It's free, it's soft when used correctly, and it produces images with an organic warmth that resonates with certain audiences.
Advantages of Natural Light
- Zero cost: No equipment investment required beyond a reflector (which you can make from foam board).
- Soft, flattering quality: A north-facing window on an overcast day acts like a giant diffused softbox — even, soft light with gentle shadows that reveal product form without harsh contrast.
- Warm, organic feel: Natural light photographs have a quality that resonates with lifestyle, artisan, and wellness audiences. It feels authentic rather than clinical.
- Ideal for specific categories: Food photography, natural skincare, handmade goods, and lifestyle fashion all photograph beautifully in natural light.
Disadvantages of Natural Light
- Inconsistency: A cloud passing across the sun changes your exposure by 2–3 stops in seconds. Your images will vary across a single shoot session.
- Time-restricted shooting: You can only shoot during daylight hours — typically a 4–6 hour productive window depending on your location and season.
- Colour temperature shifts: Natural light ranges from warm (around 2,500K at golden hour) to cool-blue (over 10,000K on a clear sky). This shifts throughout the day, making colour consistency across a catalogue extremely difficult.
- No reshoots on demand: If a client needs one additional image three weeks later, you cannot replicate the exact lighting conditions. This is a serious problem for catalogue consistency.
Best For
Handmade and Etsy-style products, artisan food, natural cosmetics and skincare, organic brands, lifestyle fashion, and any product where warmth and authenticity matter more than clinical precision.
Studio Lighting: Pros and Cons
Studio lighting — softboxes, strobes, continuous LED panels — gives you complete control over every aspect of the light: its direction, intensity, colour temperature, and spread. This control comes at a cost, but it pays back over time through consistency and repeatability.
Advantages of Studio Lighting
- Complete consistency: Every image in a catalogue can be lit identically, regardless of when it's shot. This is essential for brands with multiple SKUs.
- Shoot any time: Midnight or noon — the light is identical. This matters when you're processing high-volume orders on a deadline.
- Full reproducibility: Note your settings, mark your light positions, and any reshoot three months later will match the original exactly.
- Adjustable colour temperature: Most LED studio lights let you dial in colour temperature from 2,700K to 6,500K. Set it to 5,500K and forget about white balance drift.
- Controllable shadows: Move lights, add flags, use diffusion panels — you control exactly what shadows appear and where.
Disadvantages of Studio Lighting
- Upfront cost: An entry-level softbox kit suitable for e-commerce runs $100–$300. Professional continuous LED setups cost considerably more.
- Space requirements: A two-light setup with a sweep backdrop needs at least 2.5m × 2.5m of usable floor space.
- Learning curve: Understanding light ratios, how to feather a softbox, and how to control reflections takes time and experimentation.
- Risk of looking artificial: Poorly positioned studio lights produce flat, over-lit images that look clinical and unappealing — especially for lifestyle products that benefit from natural warmth.
Best For
White background product photography for Amazon and other marketplaces, electronics, fashion, jewellery, watches, and any high-volume commercial shoot where consistency across hundreds of SKUs is non-negotiable.
The Two-Light Studio Setup (Most Common)
The two-light setup is the standard starting configuration used in professional product photography studios. It balances simplicity with control and works across the widest range of product types.
- Key light (main softbox): Position a large softbox at 45° to the product — roughly at 10 o'clock or 2 o'clock position relative to the camera axis. Raise it slightly above product height and angle it down. This is your primary light source and defines the shape, texture, and depth of the product.
- Fill light (second softbox): Place a second, lower-powered softbox on the opposite side of the product. Set it to 50–70% of the key light's power. Its job is not to create its own look — it's to reduce the shadows cast by the key light to a controlled, flattering level without eliminating them entirely.
The ratio between key and fill determines how dramatic the lighting feels. A 2:1 ratio (fill at half the key's power) produces soft, even commercial lighting. A 4:1 ratio creates deeper shadows and more three-dimensional depth — useful for showing surface texture on leather goods or ceramics.
One-Light Setup with Reflector
If budget is the constraint, one softbox plus a foam board reflector handles 80% of product photography competently. This is the most cost-effective professional setup available.
Position your single softbox at 45° as the key light (same as above). On the opposite side of the product, stand a large piece of white foam board at an angle to catch and bounce the spill from the key light back onto the shadow side of the product. Adjust the angle of the foam board to control how much fill you're bouncing — further away produces less fill, closer produces more.
A $2 foam board from a stationery store performs almost identically to a $150 reflector panel for most product types. Tape two boards together for a larger bounce surface. This setup is particularly effective for bottles, packaging, and mid-size apparel where you need soft shadow control without the investment of a second powered light.
Colour Temperature: What to Know
Colour temperature is measured in Kelvin (K) and determines whether your light looks warm (orange) or cool (blue). Getting this wrong creates colour casts that require heavy post-processing correction — and sometimes can't be fully corrected at all.
- Studio setup: Set all lights to 5,500K (daylight balance). Set your camera white balance to match. Every image will have neutral, consistent colour straight from the camera.
- Natural light: Shoot between 10am and 2pm when the sun is high. During this window, colour temperature is relatively stable (5,000–6,000K range) and consistent. Early morning and late afternoon light shifts dramatically toward warm orange.
- Never mix natural and studio light: Mixing a 5,500K studio light with natural window light creates a two-colour-temperature scene. Part of the product will read warm, part will read neutral or cool. This colour cast is extremely difficult to remove in post-processing and should always be avoided.
Products That Need Studio Light
Certain product types are almost impossible to photograph well under natural light alone:
- Jewellery: Gemstones and precious metals need precisely positioned light to create controlled reflections that reveal cut, clarity, and finish. Natural light scatters unpredictably on reflective surfaces and is nearly impossible to position with the precision jewellery photography requires.
- Highly reflective products: Watches, electronics, chrome hardware, and lacquered surfaces pick up every uncontrolled reflection in the room under natural light. Studio lighting with flags and controlled angles eliminates unwanted reflections.
- Pure white backgrounds for Amazon: Amazon's Pure White Background requirement (RGB 255,255,255) is essentially impossible to achieve consistently with natural light. A studio setup with a sweep backdrop and properly positioned lights makes this reproducible on demand.
- High-volume shoots: Any shoot with more than 20–30 SKUs needs studio lighting for consistency. Shooting 200 products over multiple days under natural light will produce a catalogue that looks visibly inconsistent.
Products That Work Well With Natural Light
Natural light is not a compromise for these categories — it's often the better choice:
- Textiles and soft furnishings: Cushions, throws, woven baskets, and linen products photograph beautifully in soft window light that captures texture without harsh specular highlights.
- Natural skincare and cosmetics: Brands built around natural, organic, or clean-beauty positioning benefit from the warmth and authenticity of natural light. Clinical studio light can undermine the brand feel.
- Artisan food: Food photography is a natural light speciality. The warmth and softness of window light makes food look appetising in a way that's difficult to replicate with artificial light.
- Lifestyle fashion: Clothing photographed in natural light feels wearable and real. This is why most direct-to-consumer fashion brands — especially in the sustainable and artisan space — shoot near large windows rather than in studios.
The Editing Factor
Even a technically excellent lighting setup needs finishing in post. Exposure levels need micro-adjustment, white balance needs verification against a neutral grey, shadows may need opening up or deepening, and product surfaces often need retouching to remove dust, lint, or minor imperfections that the camera captures even when the human eye misses them.
This is where the production pipeline breaks down for most sellers. You can nail your lighting setup and still publish images that look slightly off — because the editing step wasn't completed to the same standard.
Common Lighting Mistakes in Product Photography
Even photographers who understand the theory make predictable errors in setup. These are the most frequent lighting mistakes seen across e-commerce product shoots:
- Overhead light as key light: Positioning a light directly above the product creates "top-down" shadows that obscure the product's front face. This is the most common mistake in makeshift home setups — kitchen downlights should be switched off during any product shoot.
- Too many lights with no purpose: Beginners often add a third or fourth light to "brighten" the image, but each additional light source adds complexity to shadow management and can eliminate the depth that makes the image look three-dimensional.
- Shooting toward a window: Having the window behind the product (backlit) without controlling the front fill creates a silhouette effect. You want the window light hitting the product front-on or at 45°, not from behind.
- Forgetting the background: The backdrop receives as much light as the product. A dirty, wrinkled, or under-lit backdrop ruins an otherwise well-lit product shot. White seamless paper swept from wall to floor is the cleanest and cheapest solution.
How to Test Your Lighting Before a Full Shoot
Testing before committing to a full catalogue shoot saves hours of reshooting. Follow these steps to validate your lighting setup:
- Shoot a grey card test: Photograph a grey card (or any neutral grey surface) at your planned camera settings. Check the histogram — it should peak in the centre with no clipping on either end.
- Use overexposure warnings: Switch your camera's live view to overexposure warning mode (the "blinkies"). Any red-blinking area in the product will appear blown out in the final image — lower the light power or move the light further back until blinkies disappear from the product surface.
- Inspect the shadow side: If shadows are completely black, your fill ratio is too high (4:1+). Move your reflector or second softbox closer to open up detail.
- Check for colour casts: Zoom into any white or neutral grey surface in the image on your camera screen. If it reads as warm or cool, adjust the colour temperature or white balance setting until it reads neutral.
- Bracket your exposures: Take a bracket of three exposures (the planned exposure ±1 stop each way) and review them in post. This confirms your working range and prevents a reshoot if exposure is slightly off.
BLACKFOX DIGITAL colour-corrects and retouches product images from $0.35/image, with 24-hour turnaround and manual execution on every file. Whether your images were shot under studio lights or natural light, the finishing work is the same — and it's what separates a catalogue that converts from one that doesn't. Submit a sample batch for a free trial.