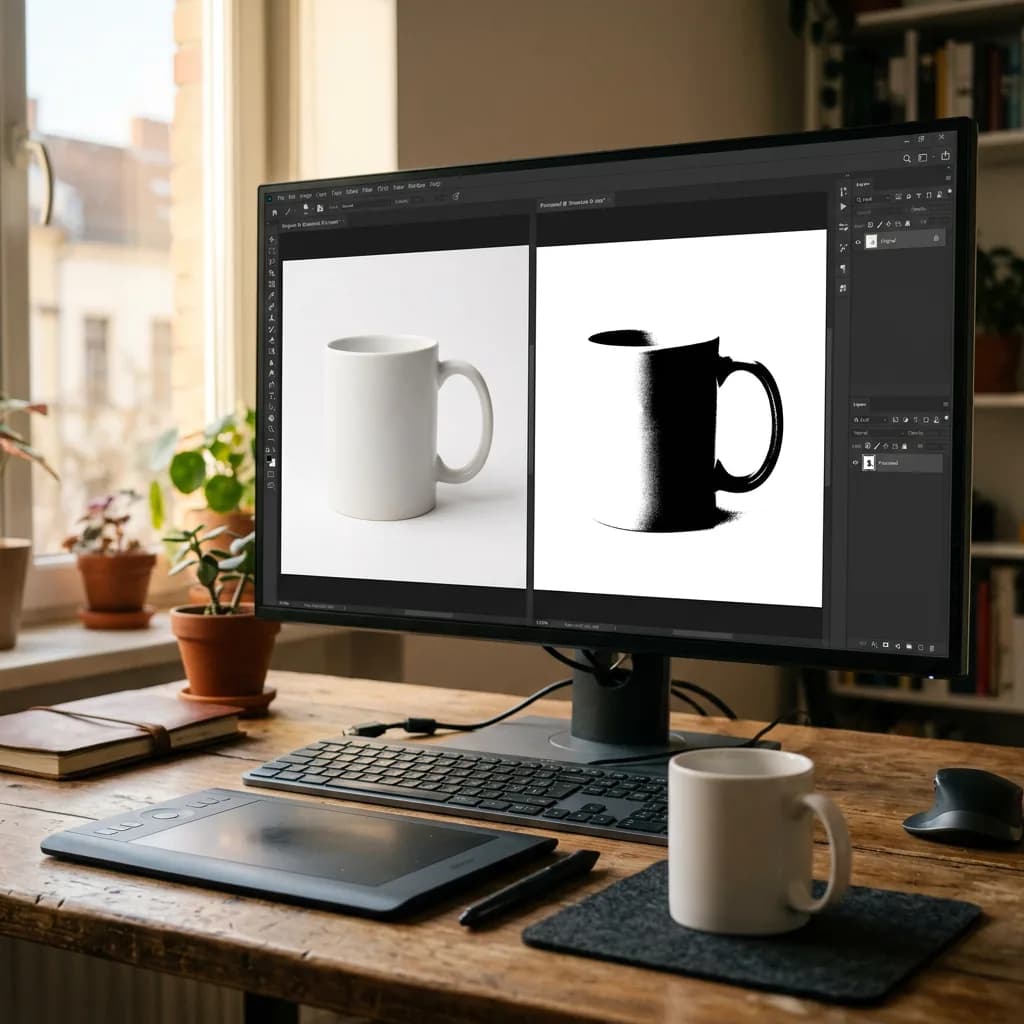
Marketplaces don't want a background that looks white; they want one that is white: RGB 255, 255, 255. Here are four ways to get there in Photoshop, the one-minute Threshold trick that reveals every off-white pixel, and how to keep white products from disappearing into the background.
A background can look perfectly white on your screen and still fail a marketplace check. Amazon, and many other marketplaces that follow the same convention, expect main images on pure white, which in digital terms means every background pixel reads exactly RGB 255, 255, 255 (hex #FFFFFF). A background of 248 or 250 looks white to the eye, but it's light grey to a computer, and on a white product page it shows up as a faint grey box around your product. This guide covers four ways to make a pure white background in Photoshop, how to prove it's really pure white, and how to handle the tricky cases.
Why "Almost White" Isn't Good Enough
- Marketplace rules: Amazon specifies a pure white background for main images, and off-white backgrounds risk a listing being flagged or suppressed. See our guide to Amazon product image requirements for the full rules.
- The grey box effect: product pages are white. An image with an off-white background stands out as a visible rectangle, which looks unprofessional next to competitors.
- Inconsistent grids: if every image is a slightly different off-white, a category page looks patchy.
- Reuse across channels: a true white background blends seamlessly into websites, catalogs, comparison shopping ads and print layouts, so one clean image works everywhere without re-editing.
Start in the Studio: Make Editing Easier
The cleaner the original, the easier the edit. Light the background separately from the product and expose it about one stop brighter, so it's already close to white without overexposing the product. Keep the product a little away from the backdrop to reduce color spill and shadows. Our guide on how to photograph products on a white background covers the setup in detail.
Method 1: Cut Out the Product and Add a White Layer (Most Reliable)
This is the method professionals use for marketplace main images, because it guarantees pure white everywhere.
- Cut out the product with a layer mask, using the Pen Tool, Select Subject or the Remove Background button. Our guide on how to remove a background in Photoshop covers each method.
- Create a new layer below the product.
- Choose Edit › Fill, set Contents to White, and click OK. Alternatively, press D to reset colors and Ctrl+Backspace / Cmd+Delete to fill with the background color, white.
- If you want a shadow, add it on its own layer between the product and the white layer, so the white stays pure everywhere else.
Method 2: Push the Background to White with Levels or Curves
When the product was shot on a near-white backdrop, you can often brighten the background to pure white without a full cutout.
- Add a Levels adjustment layer.
- Drag the white input slider to the left until the background turns pure white. Hold Alt / Option while dragging to see clipping: areas that turn white in this view are already pure white.
- The product will brighten too, so paint black on the Levels layer's mask to protect the product, especially light-colored edges and white parts.
- A Curves adjustment works the same way: drag the top-right point to the left, then mask the product.
Best for: well-lit studio shots with an even backdrop. Watch out for: white or very pale products, whose edges can disappear when the background is brightened.
Method 3: Select the Background with Color Range and Fill It
- Go to Select › Color Range and click the background with the eyedropper.
- Adjust Fuzziness until the whole background is selected but the product isn't.
- Expand the selection by a pixel or two if needed (Select › Modify › Expand), then fill it with white on a new layer.
This is fast for simple products on even backgrounds, but less precise around soft edges and shadows than a proper cutout.
Method 4: Brighten the Background in Camera Raw
For batches shot on white, you can do much of the work at the raw stage. In Camera Raw or Lightroom, use a masked adjustment on the background, or the whites and exposure sliders, to bring the backdrop up to white, then sync the settings across the whole batch. It rarely gets every pixel to exactly 255, so finish with Method 1 or 2 for marketplace main images.
Which Method Should You Use?
| Situation | Best method |
|---|
| Marketplace main image, any product | Method 1: cutout plus white layer |
| Well-lit studio shot on a near-white backdrop | Method 2: Levels or Curves with a mask |
| Simple product on an even, plain background | Method 3: Color Range and fill |
| Large batch shot in the same setup | Method 4 in Camera Raw, finished with Method 1 or 2 |
| White or very pale product | Method 1, with a subtle shadow |
Do Shadows Break the White Rule?
A shadow is, by definition, not pure white, but a soft, natural shadow directly under or behind the product is widely used on marketplace main images, because it makes the product look grounded and real. The rule applies to the background itself: everything that isn't product or shadow should read 255, 255, 255. Avoid heavy, dark or long shadows that read as part of the scene, and check each platform's current guidelines if you're unsure.
The Threshold Check: Prove It's Really Pure White
This one-minute check reveals every pixel that isn't pure white, which your eyes can't do:
- Add a Threshold adjustment layer at the top of the layer stack.
- Drag the slider all the way to the right, to 255.
- Now every pure white pixel shows as white, and every pixel even slightly darker shows as black. Any black speckles, patches or edges in the background are off-white areas to fix.
- Delete or hide the Threshold layer when you're done; it's only a diagnostic.
You can also spot-check with the Info panel (Window › Info): hover over the background and confirm it reads 255, 255, 255 in several places, especially the corners and around the product.
White Products on a White Background
White sneakers, porcelain, white packaging and white clothing are the hardest cases, because the product's edge can merge with the background. To keep the product visible:
- Keep the product just below pure white: its brightest areas around 245 to 250, so texture and edges still read.
- Use a subtle shadow: a soft natural shadow underneath separates the product from the background without breaking the white rule elsewhere.
- Preserve edge definition: a very faint darker edge, often captured in-camera with dark cards just outside the frame, keeps the outline visible.
We cover this in more depth for footwear in our shoe photography and editing guide.
Exporting Without Losing the White
- Convert to sRGB: Edit › Convert to Profile › sRGB IEC61966-2.1. Pure white stays pure white, and colors display consistently in browsers.
- Export as JPEG at high quality: File › Export › Export As. Very low quality settings can create faint artifacts around the product.
- Check the exported file: reopen it and run the Threshold check again. Compression occasionally introduces off-white pixels near edges.
- Size it correctly: marketplaces have minimum dimensions for zoom; Amazon recommends at least 1600 pixels on the longest side, and the product should fill about 85% of the frame.
Doing It for a Whole Catalog
For dozens or hundreds of products, record the repeatable parts as a Photoshop Action: adding the white layer below the product, converting to sRGB, resizing and saving. Then run it across a folder with File › Automate › Batch. The cutout itself usually still needs a human, especially around soft or detailed edges, but automating everything around it saves hours. Run the Threshold check on a sample of the finished files, not just the first one. Our guide to batch editing product images covers the full workflow.
Common Mistakes
- Trusting your eyes: a background at 250 looks white on most screens. Always measure.
- Brightening the whole image: pushing everything until the background is white washes out the product.
- Halos around the product: a light or grey rim from the old background. Refine the mask and check against a dark layer.
- Hard, cut-out edges: a slight feather of 0.3 to 0.5 pixels keeps the edge photographic.
- Forgetting the corners: vignetting from the lens often leaves corners grey even when the center is pure white.
A Quick Pre-Upload Checklist
- Threshold check at 255 shows no black areas in the background.
- Product edges clean, with no halo against white or dark.
- White and pale products still clearly separated from the background.
- Image in sRGB, at the required size, with the product filling roughly 85% of the frame.
- Exported file checked again after compression.
Get Marketplace-Ready White Backgrounds Without the Work
Doing this for one product takes a few minutes. Doing it for a whole catalog, with every image measured at 255 and every edge clean, takes days. Our background removal service delivers pure white RGB 255 backgrounds checked on every image, ready for the requirements covered on our Amazon product photo editing page and every other marketplace. Start a free trial and we'll prepare your first images at no cost.